Creating a Christmas Tree Fruit Tray
If you’re looking for a show-stopping yet easy holiday appetizer, this Christmas Tree Fruit Tray checks all the boxes—healthy, beautiful, and ready in just 10 minutes. Whether you’re hosting a holiday party or contributing to a church potluck, this festive platter will stand out on the table and encourage everyone to grab a few fresh bites between cookies and casseroles. It’s not just for Christmas, this could be used for any occasion.
As a homesteader who loves homemade treats but also appreciates no-fuss options during the busiest season of the year, this recipe is one of my favorites. It’s kid-friendly, budget-conscious, and easy to customize based on what’s in season or on sale.

Ingredients
- 1½ cups green grapes
- 2 cups purple grapes
- 8 oz. Colby cheese cubes
- 8 oz. cheddar cheese cubes
- 5 kiwi, sliced into rounds
- 1 chunk of fresh pineapple
- Fresh rosemary sprigs (for garnish)
- Optional: A small star-shaped cookie cutter

Instructions
- Wash and dry all fruit thoroughly. This step is essential to prevent the fruit from sliding around on the platter.
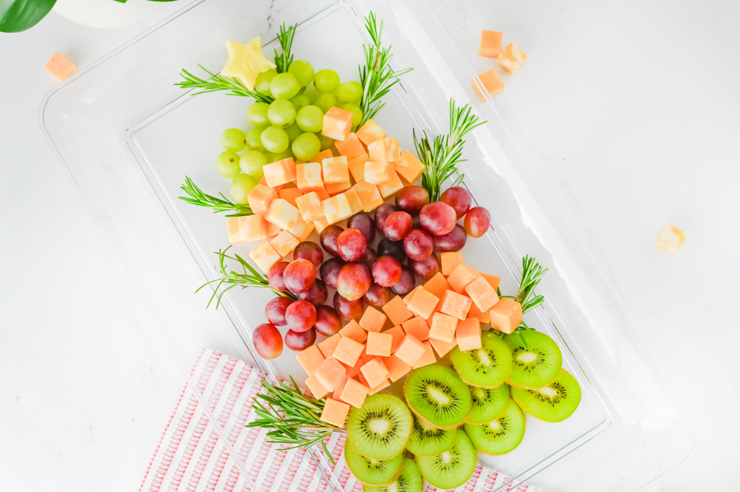
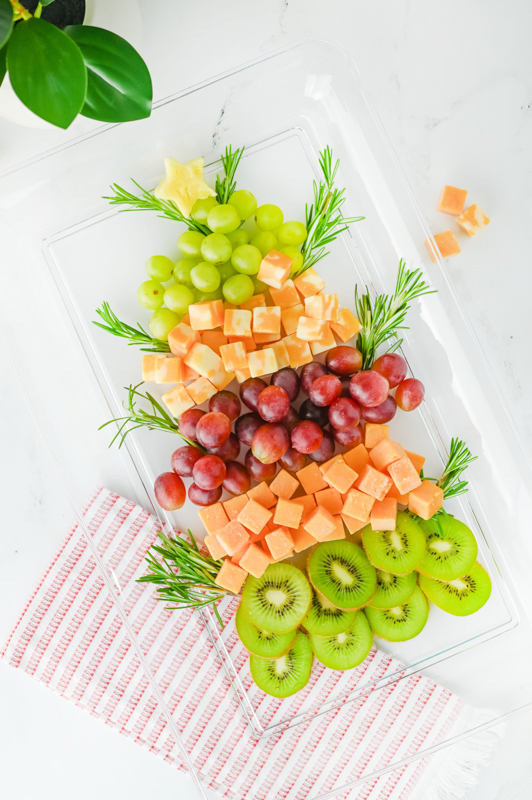
- Start mapping out your tree shape on a large rectangular cutting board or serving tray. Begin by framing the tree using a single line of each ingredient, working from the bottom up. This will help you keep the shape even before filling it in.
- Bottom layer: Use sliced kiwi to form the base of the tree.
- Second layer: Add cheddar cheese cubes above the kiwi.
- Third layer: Place a layer of purple grapes above the cheese.
- Fourth layer: Add Colby cheese cubes.
- Top layer: Finish the tree shape with green grapes.
- Tree topper: Use a small star-shaped cookie cutter to cut a star out of a chunk of fresh pineapple. Place it at the very top of your tree.
- Finishing touch: Garnish the tray with fresh rosemary sprigs around the tree to give it a wintery, evergreen look.
- Free Printable Recipe Card
Tips & Tricks When Making A Christmas Tree Fruit Tray
- Cheese Tip: Use block cheese for better flavor and slice it into even cubes yourself for a more rustic and fresh look.
- Budget-Friendly Option: Swap out fruits based on what’s in season or on sale. Strawberries, apples, or mandarin oranges work well, too.
- Add Crunch: If you want to have more variety, tuck in a few pretzel sticks or candied nuts around the edges.
- Make Ahead: You can prep the fruit and cheese cubes for the Christmas Tree Fruit Tray the night before, store them separately in airtight containers, and assemble right before serving.
Serving Suggestions for a Christmas Tree Fruit Tray
This Christmas Tree Fruit Tray serves about 10 people as an appetizer or part of a larger snack spread. It’s a great addition to brunch, Christmas Eve dinner, or even a cookie decorating party for the kids. Pair it with a festive dip, sparkling cider, or homemade hot chocolate for a complete holiday snack station.

Christmas Tree Fruit Tray
An easy, festive holiday appetizer for parties, potlucks, or family gatherings
Ingredients
- 1½ cups green grapes
- 2 cups purple grapes
- 8 oz. Colby cheese cubes
- 8 oz. cheddar cheese cubes
- 5 kiwi, sliced into rounds
- 1 chunk of fresh pineapple
- Fresh rosemary sprigs (for garnish)
- Optional: A small star-shaped cookie cutter
Instructions
- Wash and dry all fruit thoroughly. This step is especially important so the fruit doesn’t slide around on the platter.
- Start mapping out your tree shape on a large rectangular cutting board or serving tray. Begin by framing the tree using a single line of each ingredient, working from the bottom up. This will help you keep the shape even before filling it in.
- Bottom layer: Use sliced kiwi to form the base of the tree.
- Second layer: Add cheddar cheese cubes above the kiwi.
- Third layer: Place a layer of purple grapes above the cheese.
- Fourth layer: Add Colby cheese cubes.
- Top layer: Finish the tree shape with green grapes.
- Tree topper: Use a small star-shaped cookie cutter to cut a star out of a chunk of fresh pineapple. Place it at the very top of your tree.
- Finishing touch: Garnish the tray with fresh rosemary sprigs around the tree to give it a wintery, evergreen look.
-
Homemade Dog Paw Balm for Soft, Healthy Paws
Learn how to make homemade dog paw balm with simple, pet-safe ingredients to soothe dry, rough, and cracked paw pads.
-
Homemade Stage 1 Baby Food with Fresh Fruit
Make homemade stage 1 baby food with fresh fruit and simple ingredients. Includes strawberry, blueberry and banana recipes.
-
Heavy Metals in Protein Powders: What to Know
Heavy metals in protein powders? Learn what Consumer Reports found and how to make informed supplement choices.
-
Cook | Desserts | Instant Pot | Recipe
Instant Pot Banana Bread in a Jar
Instant Pot Banana Bread in a Jar is a cozy, single‑serve treat made with simple ingredients and steady, even pressure‑cooking. These little jars cool quickly, store beautifully, and make an easy grab‑and‑go snack for busy homestead days.
-
Cook | Drinks | Homemade Pantry | Recipe
How to Make Almond Milk at Home (Easy Guide)
How to Make Almond Milk at Home with simple ingredients, easy steps, and helpful tips for fresh, creamy homemade milk.
-
Strawberry Leaf Benefits: Ways to Use Strawberry Leaves
Discover strawberry leaf benefits and learn how to use strawberry leaves in tea, smoothies, salads, and more.