Can You Freeze Sourdough Pizza Dough?
Looking to elevate your family classic pizza nights with a twist? Dive into the world of sourdough discard pizza dough! Wondering if you can freeze sourdough discard pizza dough without compromising flavor or texture? The answer is a resounding yes! In this guide, we’ll unravel the secrets of freezing sourdough pizza dough. Ensuring that every homemade pie delivers on taste and convenience.
Plus, we’ll share a delectable sourdough discard recipe that promises to transform your pizza nights into unforgettable culinary adventures. Making sourdough pizza dough can yield fantastic results, but it requires some patience and attention to detail. Get ready to savor the magic of sourdough in every bite of your next delicious pizza creation!

What Flour Is Best for Pizza Dough?
When making pizza dough, selecting the right flour is essential for achieving the perfect balance of texture and flavor in the final crust. For our sourdough pizza dough, using a combination of bread flour and all-purpose flour yields the best results. Bread flour provides the necessary protein content for structure and chew, while all-purpose flour helps create a lighter texture.
The addition of olive oil not only enriches the dough but also contributes to a crispy and flavorful crust. When working with sourdough recipes, the fermentation process is vital for developing complex flavors. Using a dough hook for kneading guarantees proper gluten development without overworking the dough. By carefully choosing the right flour and following the recommended techniques, you can elevate your pizza crust to new heights of deliciousness.
How Much Starter Do I Need for Pizza Dough?
To achieve the ideal consistency and flavor in your sourdough pizza dough, the recipe calls for 1 cup of essential sourdough starter discard. Using this sourdough starter in your homemade pizza dough not only enhances the taste but also contributes to the perfect texture of your pizza crust. Incorporating sourdough discard into your pizza recipe brings depth and complexity, elevating the overall flavor profile.
When working with organic ingredients and traditional cooking techniques, the proper amount of starter plays a vital role in achieving that signature tangy taste and airy texture that sourdough enthusiasts love. If your sourdough ends up being too sour, the best way to fix that the next time is to reduce your total fermentation time.
At What Temperature Do You Cook Sourdough Pizza?
For baking the perfect sourdough pizza, preheat your oven to 500°F. Here are some tips to guarantee your sourdough pizza turns out just right:
1. Let the Sourdough Pizza Dough Reach Room Temperature: Allow your sourdough pizza dough to come to room temperature before baking. This helps the dough relax and develop better flavor.
2. Use a Pizza Stone for a Crispy Crust: Place your pizza stone in the oven while preheating. The pizza stone absorbs moisture from the dough, resulting in a crispy crust.
3. Consider a Pizza Oven for Authentic Flavor: If you have a pizza oven, use it for that authentic pizzeria taste. The intense heat cooks the pizza quickly, creating a delicious sourdough crust.
4. Top with Your Favorite Toppings: Whether it’s classic margherita or a creative combination, top your sourdough pizza with your favorite pizza toppings before sliding it into the oven using a pizza peel or baking sheet.
How to Make Sourdough Pizza Crust
Have you ever wondered what makes a perfect sourdough pizza crust so deliciously unique? Instead of using commercial yeast, I’m glad I opted for a sourdough starter to leaven the pizza crust. I find that sourdough has more flavor, it’s easier to digest because of the fermentation process, with a better texture.

Using this sourdough pizza recipe is a rewarding experience that brings out the best flavors using organic ingredients and traditional cooking techniques.
Let’s get started!
To start, gather your cooking tools and ingredients, including:
- 1 cup of active sourdough starter
- 1 cup of warm water
- 3 cups of flour
- 1 teaspoon of kosher salt
- 2 tablespoons of olive oil
- Cornmeal for dusting.
Begin by mixing the sourdough starter, water, flour, salt, and olive oil to form a smooth dough. Hotter water effectively breaks down the tough gluten in flour, resulting in a softer dough with less stretchiness as it prevents the formation of a rigid structure. Conversely, thicker and sturdier doughs, like those used for bread or pizzas, benefit from the use of cold water. Adjust the hydration level of your dough according to your preference. A higher hydration dough (more water) will result in a lighter and airier crust, while less water makes a denser crust. Let it rise for a few hours until the dough has doubled.
When I make it, I transfer the dough to an oiled bowl for its final proof before shaping the soft dough into sourdough pizza bases. After spreading the pizza sauce over the piece of dough, I use a wooden spoon to evenly distribute it. Sprinkling mozzarella cheese generously over the pizza creates a gooey and delicious topping. Add your favorite toppings, and bake until golden brown and crispy.
Sourdough pizza tends to bake faster than those made with commercial yeast due to the higher acidity. Keep an eye on your fresh pizza while it’s baking to prevent it from burning. I found the sourdough dough provided a unique, tangy flavor to the final pizza, making it stand out.
You may consider using whole wheat when making your pizza dough recipe.
How Do You Ball a Sourdough Pizza Dough?
To ball sourdough pizza dough, follow these simple steps for the best results:
- Prepare Your Dough: Once the dough has finished fermenting, shape each portion into a ball and let it rest for about 30 minutes.
- Divide into Portions: Using a sharp knife or bench scraper, divide the dough into equal pieces, depending on how many pizzas you plan to make. Form each portion into a tight ball shape. After your sourdough pizza dough has completed its first rise, transfer it to a lightly floured surface. When stretching the dough, handle it gently to avoid knocking too much air out of it. Use your hands to stretch it into the desired shape, or you can use a rolling pin if preferred. Incorporating a set of stretches during the dough preparation helps develop its gluten structure.
Take a break
Allow to Rest: Place the balls of dough onto a lightly floured surface or a large bowl. Cover them loosely with plastic wrap or a clean kitchen towel and let them rest for about 20-30 minutes. This allows the gluten to relax, making the dough easier to shape.
Shape the Dough: After resting, gently flatten each ball of dough into a disc shape with your hands. Then, working from the edges toward the center, fold the dough over itself to create a tight ball. Use the palm of your hand to roll the dough against the work surface, forming a smooth, round ball. It’s important for the shaped dough not to have any seam on the top of the dough. Air bubbles are natural in the dough, but not having a tight ball will cause more air to be trapped. Tiny air pockets in pizza dough usually pose no problem, but larger ones can result in toppings slipping off and the crust possibly burning.
Final Rise: Once all the balls of dough are shaped, place them on a lightly floured surface or in a large bowl, leaving enough space between them to expand. Cover them again and let them rise for another 4-24 hours in the refrigerator. This slow rise develops flavor and texture. If you have extra dough, consider freezing it in a plastic bag for future use. The next day, after fermenting overnight, the sourdough pizza crust was ready to be shaped and baked.

Now you’re ready for pizza!
After the final rise, your dough balls are ready to be used for making delicious pizzas. Alternatively, if you’re not using them immediately, try freezing sourdough pizza dough in a plastic bag for future use. Just be sure to thaw the frozen dough in the refrigerator overnight before using.
By following these steps, you’ll achieve perfectly shaped sourdough pizza dough balls every time, ready to be transformed into mouthwatering pizzas with a chewy crust at a moment’s notice.
Can You Freeze Sourdough Pizza Crust?
Freezing sourdough pizza crust is a convenient way to preserve its freshness for future use. When it comes to freezing sourdough pizza dough for later enjoyment, here are some tips to make the process seamless and effective:
1. Prepare Dough Balls: After the bulk fermentation and first rise, divide the dough into individual portions to form dough balls. This makes it easier to guarantee what you need, whether making thick-crust pizza or thin-crust pizza.
2. Wrap with Parchment Paper: Individually wrap each dough ball in parchment paper before placing them in a freezer bag. It’s a great way to prevent the leftover dough from sticking together. To preserve the dough for later use, I stored it in an airtight container and placed it in the freezer.
3. Label and Date: It’s a good idea to mark the freezer bag with the date and contents to keep track of when the dough was frozen. This ensures you use the oldest dough first. Fresh pizza dough can be kept in the freezer up to 3 months if you properly store it. You could also add a use-by date as an extra precaution so the dough isn’t forgotten.
4. Use Plastic Wrap for Freezing Sourdough Pizza Dough: For extra protection, double wrap the freezer bag in plastic wrap to create an added barrier against freezer burn. This extra step helps maintain the quality of your sourdough pizza crust until you’re ready to bake.

How Do You Defrost Sourdough Pizza Dough After Freezing?
To defrost frozen sourdough pizza dough, place the wrapped dough balls in the refrigerator overnight. This gentle thawing process helps keep the flavors and textures created by using homemade sourdough bread and organic ingredients.
As homesteaders who value traditional cooking techniques, we grasp the significance of preserving the integrity of our dough. By allowing it to thaw in the fridge slowly, we guarantee that the active starter in our sourdough pizza dough stays viable and ready to craft delicious recipes.
Once the sourdough pizza dough has thawed overnight, it’s crucial to let it come to room temperature before shaping and baking. This step ensures that the dough is easy to work with and results in a beautifully textured crust.
How Long Can Sourdough Pizza Dough Last in the Fridge?
After thawing the frozen sourdough pizza dough in the refrigerator overnight, the next consideration is how long it can last in the fridge. When it comes to fridge storage for sourdough pizza dough, here are some key points to keep in mind:
1. Optimal Freshness: Homemade sourdough pizza dough can last in the fridge for up to 3-4 days, maintaining its flavor and texture, making it the perfect recipe for an easy dinner time.
2. Long-Term Storage: If you need to store the dough for longer periods, freezing sourdough pizza dough is the best choice to preserve the dough’s quality and taste over several weeks.
3. Sourdough Starter Health: Keeping the dough in the fridge helps maintain the health of your sourdough starter, ensuring it stays active and ready for future baking.
4. Convenient Meal Prep: Having sourdough pizza dough on hand in the fridge allows for quick and easy meal prep, a great thing for busy days when you crave a homemade sourdough crust pizza.
My Favorite Sourdough Pizza Tools
When it comes to crafting the perfect sourdough pizza, having the right tools at your disposal can make all the difference. Here are some of my favorite sourdough pizza tools that will take your homemade pies to the next level:
Helpful Items
- Digital Kitchen Scale: An essential for every sourdough kitchen, ensuring precise measurements for the perfect dough consistency.
- Gas-Fired Pizza Oven: Elevate your pizza game by cooking sourdough pizza outdoors with a gas-fired pizza oven.
- Wooden Pizza Peel: Ideal for resting shaped pizza bases, this tool is a must-have for any pizza enthusiast.
- Pizza Stone: Not just for pizza, this versatile tool can also be used for bread baking. It will provide even heat distribution for a crispy crust.
- Perforated Pizza Trays: Ideal for baking delicious pizza in your home oven, these trays guarantee consistent cooking and a crispy crust every time.
- Aluminum Baking Steel: Make transferring pizza from the wooden peel to the pizza oven a breeze with this handy tool.
- Pizza Turner: Simplify the process of turning sourdough pizza while it’s cooking with a high-quality pizza turner.
- Pizza Rocker: A must-have for cutting pizza like a pro, this tool makes slicing through your pie effortless and precise.
- Oven Thermometer: Ensure your oven is preheated to the perfect temperature for baking sourdough pizza with an accurate oven thermometer.
- Stand Mixer: Simplify the dough-making process with a stand mixer, allowing you to achieve the perfect dough consistency with ease.

It’s PIZZA TIME!
With these essential sourdough pizza tools in your arsenal. You’ll be well-equipped to create delicious homemade pies that will impress family and friends alike. (Remember, I’ve used affiliate links to make your shopping experience more convenient!)
We hope this article has inspired you to try freezing sourdough pizza dough! With the right techniques and a little planning, you can enjoy family pizza nights anytime. Enjoy the convenience of having dough readily available in the freezer. By exploring the advantages and obstacles of freezing sourdough pizza dough, we aim to inspire your culinary exploration and enjoyment of the delectable outcomes. Happy cooking!
Loving sourdough? Try our Homemade Sourdough Bread!

Sourdough Pizza Crust
Once you've tried making a pizza with a sourdough starter, you won't want to make normal dough again.
Ingredients
- 1 cup of active sourdough starter
- 1 cup of warm water
- 3 cups of flour
- 1 teaspoon of kosher salt
- 2 tablespoons of olive oil
- Cornmeal for dusting.
Instructions
Sourdough Pizza Dough & Baking Steps
1. Mix the Dough (10–15 minutes)
Combine sourdough starter, warm water, flour, salt, and olive oil in a large mixing bowl. Mix and knead until a smooth, cohesive dough forms.
2. First Rise – Bulk Fermentation (4–6 hours)
Cover and let the dough rise at room temperature until it doubles in size.
Optional: After 1–2 hours at room temp, refrigerate overnight for a more developed flavor.
3. Final Proof (30–60 minutes)
Transfer the dough to a lightly oiled bowl. Let it rest until puffy and airy.
If chilled, allow extra time for the dough to come to room temperature.
4. Shape the Dough (10–20 minutes)
Gently divide and shape the dough into individual pizza bases. Handle lightly to retain airiness.
5. Assemble the Pizza
Spread pizza sauce over each base using a wooden spoon for even coverage. Top generously with mozzarella cheese and add your favorite toppings.
6. Bake the Pizza (6-10 minutes)
Preheat your oven to 475–500°F (245–260°C). Bake the pizza on the middle or top rack until the crust is golden and crispy.
Optional for crispiness:
After 6-8 minutes, switch to broil for 1–2 minutes to brown the top.
7. Enjoy
Remove from the oven, cool slightly, slice, and enjoy your tangy, sourdough pizza.
Notes
More water: Airier, lighter crust
Less water: Denser, chewier crust
Check Out Some of Our Other Posts
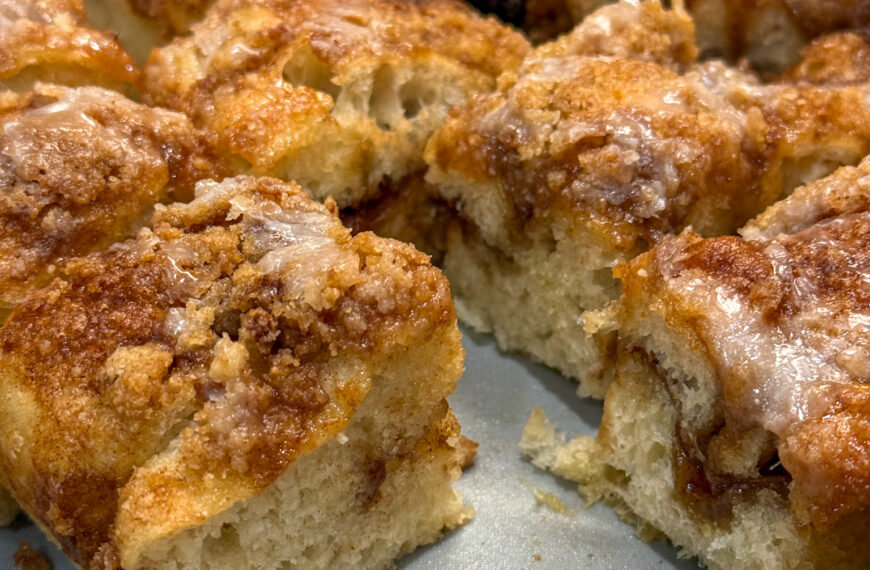
Cinnamon Roll Focaccia Bread Recipe (Better Than Cinnamon Rolls!)
Try this cinnamon roll focaccia recipe with buttery cinnamon filling, crumble topping, and sweet icing. Better than cinnamon rolls.

Follow Us on Social Media
The Oklahoma Homesteader Facebook Page
U.S. Homesteading for Beginners Facebook Group